Troubleshooting and Maintenance
ENGRAVING PROBLEMS AND SOLUTIONS
Troubleshooting can take on many faces since equipment, technique and knowledge all play a part in the problems and solutions associated with engraving. Discussions on troubleshooting a specific piece of hardware or software must be left to the specific equipment manufacturer. I've focused on the typical culprits that affect engraving techniques, set-up and quality. These problems can often leave you scratching your head and asking yourself, "How did I ever miss this?"
POOR LETTER QUALITY
Poor letter quality can be defined as any undesirable look or appearance caused by poor materials, poor workmanship, or improper set-up. Given that we can control these items, many problems can be solved and there's no reason to be ashamed of the engraving we produce. People will pay for quality and respect you for providing it. Basic letter quality problems are caused by several factors that can be addressed by recognizing the cause. Take corrective action and the problems will disappear. On the other hand, ignore them, and you’ll be pummeled by your competitor while he laughs all the way to the bank.
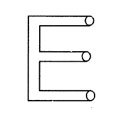
Problem #1: The letters simply look ragged. Us are not round and smooth. Line segments do not meet up properly on letters such as E, F and T.

Possible Solutions:
- You are engraving too fast. Slow down! Seems simple but it’s not always obvious. Each engraving system, based on its original design specification, will act differently at various speeds. Generally, the faster you drive the mechanical motion the poorer the letter quality. Running two separate diamond drag jobs may test this theory. Run one at top speed and another at half. Looking under magnification will reveal imperfections in arcs such as the letter O and, possible overshooting in one direction or another.
- If you are diamond drag engraving, you have too much down pressure or you are engraving too deep. Change the down pressure. We’re not supposed to be digging for gold. Too much pressure results in a very rough finish, leaves burrs on metal plates and causes premature tool wear.
- You have a worn or dull cutter. This may not be as obvious in diamond drag where the tool wear is gradual. If letters are ragged or rough when rotary engraving, check the cutter first. A 10X eye loupe is a handy tool to have in the shop for cutter tip inspection. Small nicks or unusual wear will cause the cutter to plow and rip through the plastic materials leaving unclean finishes.
Hint: Whenever you start to use a new diamond cutter, engrave a little sample in brass or aluminum. Later, when you think that you have cutter wear, you can compare a recent sample to the original.
- Check to see if your material is securely fastened to the table. If it moves, even a little, it can create an uneven letter.
Problem #2: The quality of cut is ragged or exhibits steps.
Possible Solutions:
- You may have play in the cutter. This could be in the gap between the cutter and the spindle shaft. Maybe the shaft is worn or the spindle bearings need to be replaced. Once a shaft starts to wear and a cutter is loose, the problem can worsen quickly. Spindle bearings take the brunt of the load and will wear very fast if the play is not stopped. On a very rare occasion, you could get a cutter that's undersize for the spindle. If you suspect this, try switching to any other cutter in your library to prove it. If the play goes away, it could be the culprit, (but it is rare).
- The spindle is loose in the housing or block. Check this by grabbing the cutter at the bottom of the spindle and trying to move it. Older systems have bearings in the Z-axis that wear over time and need to be adjusted or replaced.
- The carriage is loose or has excessive play. Check the X-axis bearings or slides. As you progressively move from the cutter to the spindle block to the carriage, you will have increasing difficulty detecting the problem. Moving the large mass of the carriage to detect play is not easy.
- If you are drag engraving, the diamond cutter may be loose. This is the same idea as solution # 1 of this problem; however, there is a twist. Drop-in diamonds may exhibit the same kind of looseness in the spindle as any other cutter. Try switching to a diamond drag adapter. This diamond is held more securely and much closer to the work. Make sure that you screw the diamond drag adapter all the way onto the spindle housing. If too many threads are showing, it may move during engraving.
- It may be time to pull a little preventative maintenance on your system. Something may be loose.
Problem #3: Poor letter quality, "The really bizarre."
Possible solutions:
- The spindle motor is turning backwards. Don't laugh, this can happen. If you recently changed the engraving motor or let one of your staff play repairman, it's possible. To test, turn the spindle motor speed to a rpm that is slow enough for you to see the direction of revolution. When you are looking down from above the spindle, it should be rotating clockwise. If it's counterclockwise, you've got problems.
Problem #4: While burnishing aluminum you have voids or non-engraved areas.
Possible solutions:
- Try re-engraving the same plate again. Some of the anodized aluminum plates have very hard surfaces and two passes are required.
- Switch to a diamond burnisher. The more common carbide tools may have difficulty getting through the tough surface and are more easily worn down, thus sometimes skipping across the surface.
- Increase the pressure of the z-axis or burnishing adapter.
- Try other materials. Same reasons as above. Some materials, from some vendors, are just plain difficult to work with.
- If you're doing diamond drag, insure that the material is flat. You may have set up the job at one depth and over the area of the plate surface you have a variable depth. This can be caused by the thickness of hold down tape you use.
- Switch to brass - it's easier.
Problem #5: I've checked everything known to man and I still have letter quality problems.
Possible solutions:
- Guess what? It may be the font (letter style) that you are using. Some fonts are of poor quality. I won't name names, but if you grow a letter style large enough, you may see the line segments (vectors) that made up the character. Font creation for engraving is a technical subject. There are several methods and several techniques that have existed through the years. Some combinations of equipment technology and font creation technology just don't work well together. It's too difficult to give you a rule of thumb, and you just have to accept the fact that some fonts engrave poorly.
- Try reducing the size of the letter if possible to mask the problem. Most font problems look worse at larger letter sizes.
- Try to use good quality engraving fonts. I know, the manufacturer told you that you could use any font. Well, you can, BUT ... the font may have been originally produced for printing or some other application and may engrave poorly, not to mention very slowly. Ask the manufacturer for their recommendations regarding the use of fonts.

Problem #6: Engraving on the plate is "slanted".
Possible solutions:
- Check material for squareness. Maybe your shear does not cut squarely.
- Check to see if the material on the table is indeed at a true home and is square to your scale bars or table side stops.
- If your table is equipped with scale bars, insure that they are secure and flush to your T -Slot table. Many times these become loose and you'll have a false home location.
Hint: Always inspect your job before removing your plate from the system. You may be able to salvage it by re-engraving the job, or at a minimum, you may be able to analyze the problem and prevent repeating it. Perhaps the plate moved during engraving. Removing it without inspection would prevent you from detecting this problem.

Problem #7: You are using a nosecone, but your engraving is "shallow" across the top or left margin of your plate. It engraves properly when the spindle is away from the edge.
Possible solutions:
- Your nosecone is riding on the scale bars or side stops. Loosen and lower the scale bars so that they are below the level of your material surface. Re-tighten the thumbscrews.
- Check to see if your material is lying on top of the scale bars or side stops. It's easy to miss during set-up especially if the plate is thin material.
- Check the thumbscrews to be sure they're tight and not stripped.
Problem #8: You are using a nosecone and you are getting uneven engraving.
Possible solutions:
- Your spindle is not "zeroed" to your material. Follow your "Basic Engravers Guide" to zero your spindle.
- You are not using enough float, and need to adjust the down stroke until your nosecone touches the material with some pressure. Don't forget that applying pressure is necessary if you expect the nosecone to track with the plate surface.
- You may be engraving too fast for the type of material you are cutting. Slow down! The cutter may be bouncing on the surface. It's true. Some hard materials can exhibit this problem.
- You may have a dull or broken cutter. Replace or sharpen it.
- Your material may be defective.
- Your vacuum chip removal system is plugged and engraving chips are caught between the nosecone and the material. Try re-engraving to clean up the missed areas.
- The nosecone or vacuum hose is loose.
Problem #9: While engraving certain materials "Shadowing" occurs.
Possible solutions:
- Leave the protective film on the engraving material during engraving.
- Use a plastic nosecone instead of a metal one.
- The nosecone may be damaged. Inspect for burrs or roughness. Try using an emery cloth to polish the nose.
- Back off on the z-axis spring pressure.
Switch to another type of material. Satin finishes are especially prone to shadowing problems.
Problem #10: You are not using a nosecone and you have uneven engraving.
Possible solutions:
- Use a nosecone. This is the fundamental reason that engraving systems are unique from the rest of industrial machines. They really aren't meant to be used without a nosecone.
- Use a different method of holding the material. If you use double-sided tape, it may be thick enough to change your surface flatness by a few thousandths.
- Use a nosecone. Tired of hearing this?
- Parcel the job if possible so that you can have more direct control over the depth of each specific area. Engraving smaller sections at one time and/ or moving the material to a known flat area of the table can minimize some problems with material or table flatness.
Hint: Stop trying to do something that the engraving machine was not intended to do. While it's true that you can do non-nose riding engraving on virtually any system, it's not easy to hold any controlled accuracy on the depth. This takes flat material, a very flat bed, and some degree of skill and confidence. It also takes an application where some amount of uneven engraving may be tolerated. Tread carefully.

Problem #11: I'm getting "tails" or "swirls" in the corners of my engraving.
Possible solutions:
- Your cutter speed is too fast relative to your x-y speed. Slow your spindle speed down or increase your table speed.
- Your cutter is worn or damaged - replace it.

Problem #12: I'm getting "fuzz", "fur" or can see lines in the bottom of my cut showing each cutter path. I can even see steps in the bottom of my cut when I rout out a large area or cut a multi-line font.
Possible solutions:
- This problem is tough. Sometimes caused by dull cutters, the wrong cutter, or not enough overlap for each cut. Try changing cutter size slightly. You may get better clean up.
- Try taking a second pass cut that is .001" - .002" deeper. This may clean up the roughness.
- Resharpen the cutter. There are various cutter angles that can cause these kinds of problems. There is a relief angle that if too great can cause noticeable ridges in the bottom of the cut.
- Insure that the spindle is square in the mount or block. A spindle that is not square to the engraving surface means that the cutter will also not be square to the material surface.
CONCLUSION
If you cannot find the reason for poor letter quality on your own, take the time to make several samples and provide them to your local sales representative or the equipment manufacturer. They are going to want some specific information to help diagnose the problem. Let them know what model of equipment and whose font you are using, what cutter was used, how fast the spindle rpm was set, X and Y speed, etc. You can add additional information that is sometimes helpful. Tell them if it's a gradual deterioration or recent change in quality, old or new cutter, you are using an unusual or new engraving technique, etc. All of these details can come into play.
My best advice:
Always try to solve the problems yourself before seeking help. A little patient analysis goes a long way.
Never work on any problem that gets you so frustrated that you become irritated at the machine, the service technician, or the salesman. It's only a machine; don't let it get the best of you.
Last but not least, experiment. The more you try new methods or techniques, the more you will learn. Don't be afraid of your engraving machine.
The Engravers' Bible © 1999 by Rich Zydonik/National Business Media, Inc. Printed and Bound in the United States of America. All rights reserved. No part of this self-study manual may be reproduced in any form without permission in writing from the author/publisher. Additional legal, financial and professional management advice and/or assistance are encouraged.
