Basic Engraving Techniques: Diamond-Drag Engraving
APPLICATION
The easiest and most common type of engraving is "diamond-drag", also known as "scratch" engraving, for use on metals such as brass, aluminum, pewter, silver and gold. It gives equally effective results when done with either a manual or a computerized engraver and when done properly, can pass for hand engraving.
Diamond-drag engraving is usually used to remove the top colored coating to expose the bare metal underneath (gold if brass or silver if aluminum). If the material has a clear coating instead of colored, the engraved area can be oxidized to blacken it and provide a contrast to the background.
TOOLS
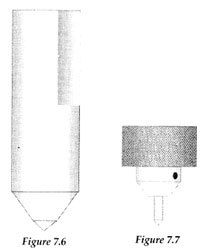
The tool used for diamond-drag is a diamond graver, consisting of steel shank with a conical pointed diamond embedded in one end. (See Figure 7.6) The diamond is shaped and then polished to a mirror finish to produce high-quality engraving. It is moved across the surface being engraved without using a spindle motor, thus the term "non-rotating diamond." Diamond gravers can be purchased to fit all standard top-loading spindle sizes or can be screwed onto the bottom of the spindle by way of an adapter (Figure 7.7), which replaces the regular nosecone and retaining ring on the spindle. This adapter is beneficial in that it transfers the stress of engraving to the spindle housing, instead of applying pressure to the bearings inside the spindle. This can prolong the life of the spindle. Some engraving systems also have a diamond spindle available, which completely replaces the regular rotating spindle, for the same reasons.

Diamond gravers are available with tip angles between 90° and 150°. The material being engraved determines the angle of cutter to use. The softer the material, the wider the angle needed. If the angle is too sharp, the tool may dig in too deeply and cause a rough cut instead of the desired brilliant finish. Also, pressure must be adjusted to suit the particular material being engraved, so as not to damage the cutting tool or the material. Here are a few guidelines:
- 90° angle - used for engraving on pens; produces a very fine line.
- 120° angle - an all-purpose tip used for general engraving on brass and aluminum for trophies and plaques.
- 150° angle - for softer materials such as gold, pewter, and silver; produces a wider stroke. The tool will ride on the surface as opposed to deeply cutting into the soft material.
Like any cutting tool, a diamond graver will wear over time and begin to produce a less appealing cut. It can be re-lapped (re-sharpened) to its original shape just as you would re-sharpen any other cutter that has become dull from use.
How long it will last depends on a wide range of factors including use, materials, operator knowledge, etc. This is complicated by the gradual, normal wear of the tool, which is too slow to notice.
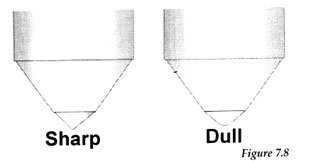
One easy way to tell if a diamond needs re-lapped or replaced is by engraving a test plate when the tool is new, and then comparing the cut to a recent piece to see if the quality has noticeably changed. You can also look for a rounding of the point of the diamond through an eye loupe. (See Figure 7.8)

Another approach is to schedule regular cutter re-sharpening or replacement based on determining the types of work that you do, and what materials you use. Establish a schedule by using the following guidelines, and note the dates on your calendar:
- Low volume shops - For general-purpose engraving, you may not need to change tools for up to an entire year. If use is occasional, it may be possible to stretch that period even longer. Keep in mind that using a tool for years without re-sharpening will lead to poor letter quality.
- Moderate volume shops - Change semi-annually to quarterly depending on your work and materials. It is recommended to set these dates by your seasonal demand.
- High volume shops - You may need to change your tools as often as weekly. Industrial applications with high volume and hard materials like stainless or abrasive materials may even need to change tools daily.
The average tool life for busy engravers and trophy shops is eight weeks. Always keep in mind that your work cannot look good if your tools are in poor condition. The quality and condition of your tools directly affect the final quality of your engraving.
TECHNIQUE
With diamond-drag engraving, there are no depth or width options. Both of these aspects are a direct result of the amount of pressure applied, the sharpness of the tool, and the number of passes engraved. Generally, the stroke width is approximately .003” - .005. If a broader stroke is required, you may need to switch to burnishing (see the next section). Another choice is to use a multi-line font, which will give the appearance of a wider character when engraved.
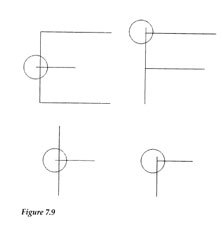
The finished appearance will vary depending on the angle of the tool, the pressure applied, the material used, and the letter style. Brass (which is harder than silver, for example) will produce a crisp, fine line. Aluminum, which is softer, will produce a rougher cut, and needs less pressure. High X and Y-axis speeds may be used when cutting brass or aluminum. The only limitation will be your expectation of a high-quality finished look. If you set the X and Y-axis travel speed excessively high for your engraving system, you may see undesirable results in the letter quality. Watch for letters like O that do not completely close where the cut started and ended. Also, letters like E or F (See Figure 7.9) may show signs of the cutter slightly overshooting parts of the character. If your engraving table is out of adjustment, you may expect round letters to be very jagged. Slow the system down a bit and recheck the results. Very hard materials, such as stainless steel, may require several passes and more pressure for the cut to go deep enough to be easily seen. Reduce the travel speed of a computerized engraver for best results.

Using a scrap piece of brass, set the cutting depth by moving the spindle to the starting location and lower the diamond so that it just touches the surface. Adjust the down pressure to assure constant contact with the material. If the metal you are engraving is very thin or flexes m a clamp or vise, it will help if you place an extra piece of scrap material under it to keep it from bowing in the center. This will prevent the engraving from being uneven.
Many engraving systems will have a Z-axis down pressure adjustment. Oftentimes it is simply a ring that can be screwed tighter to increase pressure. One of the most common mistakes is using more pressure than required. Let the diamond work naturally through the material for best results.
The Engravers' Bible © 1999 by Rich Zydonik/National Business Media, Inc. Printed and Bound in the United States of America. All rights reserved. No part of this self-study manual may be reproduced in any form without permission in writing from the author/publisher. Additional legal, financial and professional management advice and/or assistance are encouraged.
