Basic Engraving Techniques: First-Surface Rotary Engraving
APPLICATION
Rotary engraving is the process of rotating a cutting tool in a motorized spindle, which is moved through the material to produce a groove at a specific depth and in the same geometry and width as the cutter tip. It is commonly used on flexible plastic engraving stock to make items such as name badges, key tags, signage and awards. It can also be used on brass, aluminum and acrylic when deeper cuts are required than those achieved by burnishing.
Rotary engraving can be done using the least expensive pantographs to the most complex computerized engraving and routing systems. The principles are the same for all. In manual engraving the cutter is lowered by the operator into the surface of the material. The operator “traces” the copy type or letter master and reproduces the image on the substrate. In computerized engraving the z-axis is controlled mechanically by the systems stepper motors as well as in the x and y-axis to form the characters.
TOOLS
Although discussed in an earlier chapter, we will revisit the basic information required in obtaining the correct tool for rotary engraving.
There are many different engraving cutters available for rotary engraving. When you place an order with your supplier, you will need to know the following:
- The diameter of the shank - This is dictated by your spindle or collet. Usually 1/8", 1/4", or 11/64". Metric sizes are also available.
- The length of the shank - This is also dictated by your spindle or collet, ranging from 2" for collet spindles to 7" for top-load spindles. 6.5" cutting tools are standard for most systems; however some models require a tool with a length of only 4.5”. Tools 7" in length are often used when burnishing, due to the added length of the adapter.
- The type of material you are cutting - This tells the supplier the tip angles needed for the cutter to perform properly. Specify FLX (flexible plastic), PHN (rigid plastic like phenolic), BAL (soft metals like brass and aluminum), or SSS (hard metals like steel or stainless steel).
- The cutter material - Do you want solid carbide, carbide tipped or high-speed steel? Carbide cutters stay sharp longer, but high-speed steel is not as brittle and is used for fine, deep cuts in metal. Carbide tipped cutters have the same cutting tip as solid carbide, but cost less because of the steel shank.
- The tip width - How wide will the resulting cut be? This is determined by the height of the engraved character and the font used. As a general guide, a single stroke character should have a width that is approximately 12% of the height. Refer to the chart in Appendix B.
- Special engraving techniques, if any - This would include reverse engraving, profiling, parallel cuts, ballnose, or dovetail. All of these applications require additional modifications to the cutter's geometry. Refer back to the list of cutters in Chapter 3.
A VACUUM SYSTEM
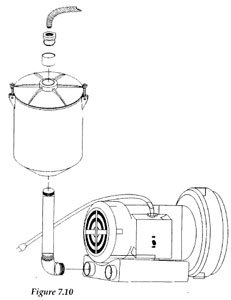
Although the need for a vacuum system was mentioned briefly in the section on engraving accessories, there's no time like the present to discuss its importance during rotary engraving. If you are cutting acrylic, Plexiglass or a flexible plastic engraving stock, a vacuum is a must. Keeping the engraving system clean is only one of the reasons we use a vacuum. Its single most important use is in the control of the depth of cut. (See Figure 7.10)

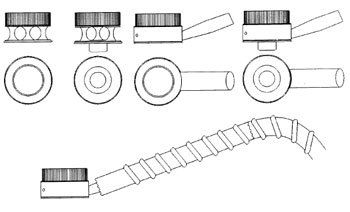
If a vacuum system is not used, the depth can be affected each time the cutter strokes up and down because the spindle nosecone can get plastic chips lodged between it and the material surface every time the cutter raises up, thus causing the depth of cut to be uneven. The loose chips can also scratch the surface of the material when caught between the nosecone and the material and dragged across the surface. Finally, if the chips are not removed by a vacuum system, they may clog up in the bottom of the spindle and cause overheating of the bearings resulting in down time and costly repairs. The facing page shows a variety of vacuum system attachments.

COOLANTS AND LUBRICANTS
Before plunging (no pun intended) into rotary engraving, it is wise to have some knowledge of the types of coolants available when rotary engraving. These are primarily used during deep cutting of metals.
The main purpose of using a lubricant or cooling agent is to keep the cutting tool cool and lubricated to minimize heat buildup and friction. This is especially critical if you plan to use your engraver to do any deep cutting or routing especially in metals (See Chapter 8). The use of cutting fluids and oils also prolongs tool life. The quality of the finished product is also adversely affected when not paying attention to this matter.
Different materials require different cutting fluids and oils to produce the desired results. When in doubt, consult the supplier of your raw stock. Using cutting fluids and oils may require timely clean up operations, especially where painting is required. Experiment with different solvents, detergents or cutting fluids and oils if necessary.
There are two different types of oils:
- Soluble Oils - Types of oils or paste compounds that form emulsions when mixed with water, soluble oils are used extensively in machining both ferrous and non-ferrous metals when cooling quality is paramount.
- Mineral Oils - This group includes all types of oils extracted from the petroleum such as paraffin oil, mineral seal oil and kerosene. Mineral oils are often blended with base stocks, but they are generally used in the original form for light machining operations.
Below are a list of general guidelines for some material types and the recommended cutting fluids. Note: Materials not mentioned may or may not require any lubrication or cooling agent. Each application, tool and machine is different and results will vary.
- Aluminum/Zinc - Emulsified or soluble oil. A good brand name is "Tap Magic" for aluminum or, C.R.C. oil 3-36.
- Brass/Copper (Not including engraving brass) - Consult the supplier if possible, but generally soluble oils are preferred. Note: Avoid cutting oils that contain active sulfur and chlorine; these will cause stains.
- Glass - Water with a small amount of dish detergent or Windex.
- Mild Steel - Emulsified oil. For simple jobs, 3-in-l will do.
- Stainless Steel - A heavy duty soluble oil is recommended. Again "Tap Magic" is a good choice.
Only concern yourself with cutting fluids if you plan to do industrial grade work. Common engraving material such as plastic do not require any cutting fluids.
TECHNIQUE
In this section we will concern ourselves with nose riding engraving, the method most commonly employed by engravers.
By now, you have read through the chapters on cutters, spindles, materials, and the engraving job set up. In fact, there is little about engraving that you do not know. You simply must apply all that you have learned up to this point to begin successfully engraving. Some common problems encountered are about the only thing you do not know at this point so we will cover some of my favorites.
If you have experience engraving, you may have seen the problem of the material surface being marred on some popular plastics that have a fine-grain structure. Materials such as those with a satin finish exhibit this problem. To help minimize this rubbing, I recommend selecting a plastic nosecone when engraving on satin stock. In fact, where marring of any plastic surface is a concern, plastic nosecones are generally used.
There are several factors that you cannot completely control which contribute to this unsightly nose-rub or shadow. To further eliminate the effects of nose-rub, the following steps can be taken:
- If you operate an air-driven Z-axis system, reduce nosecone pressure by backing off on the air pressure. If you operate a motorized z-axis system, control the Z-stroke via your mechanical settings or software.
- Sometimes least-favored but almost guaranteed to work on plastic engraving stock is to leave the protective plastic coating on the sheet while engraving. The drawback is that when the engraving is finished, there will be the secondary step of removing the protective coating from inside letters such as A, B, D, O, P, Q, R, etc. A trick here is to wrap a piece of scotch tape around the back of your hand like you would use to remove lint from a sweater. Roll your hand over the remaining pieces of the plastic coating and that should do the trick.
- Another method, not as easily achieved, is to perform non-nose riding engraving. Depending on the job and material, it may be possible to not use a nosecone at all. Unfortunately: the flatness of the engraving table and tolerances of the materials may not yield a desirable finished product. It's important to understand that the manufacturers of engraving equipment cannot always hold tight tolerances on table flatness. In fact, simply moving the table from one location in your shop to another can change the flatness over the work area.
- A smaller nosecone may eliminate the more obvious rubbing around the engraved area since the rub, if any, is confined to the area closest to the letter.
- Select a different material for the job.
As far as the selection of either a screw-on or drop-in nosecone is concerned, it's a matter of taste and speed. Screw-on noses can make the change over a little quicker. The drop in type will work as well.
FEED RATE
Different than cutter rpm, feed rate is the speed that the cutter travels through the material in the X and Y direction. Both the cutter rpm and the feed rate will have a direct effect on the quantity of the cut. Discussed in more detail in chapter 8 under "Engraving Stainless Steel", the feed rate is a measure of the distance traveled in surface feet per minute (sfpm). Without boring you with details it should be sufficient to say that a smaller cutter must work much harder to chew up the same amount of material as a larger cutter. This is usually accomplished by increasing the cutter rpm. When we have maximized our cutter rpm or achieved a desired speed, we must match the move speed proportionally. Moving too fast for the cutter rpm will load down the system and the result will be poor quality engraving or a broken tool. A slower feed rate will produce smaller cuts and much finer finishes. A high feed rate will produce large cuts and rougher finishes.
An experienced engraving operator may know the correct speeds and feeds from past work. If you are unsure, start each job at slower feed rates and ramp up until you are comfortable with the cut and the effort the system must make. Experienced engravers can "hear" the sound of the engraving system change as they cut different materials under different conditions. As you stress the cutting tool and the mechanical abilities of the system you will hear distinct sounds. Don't panic, this is normal and it should give you some comfort as you gain experience. On the other hand, if you over stress the system, the last sound you will hear is the breaking of the cutter. This is a bad thing. Sorry- there are no perfect rules you can follow. Each engraving system acts differently and you will simply need to gain experience with your system.
The Engravers' Bible © 1999 by Rich Zydonik/National Business Media, Inc. Printed and Bound in the United States of America. All rights reserved. No part of this self-study manual may be reproduced in any form without permission in writing from the author/publisher. Additional legal, financial and professional management advice and/or assistance are encouraged.
